Perhaps you’ve seen maple tapping supplies at the hardware store, or a video came up in your YouTube feed about making maple syrup at home. Or maybe you saw some sap buckets hanging on maple trees while out on a drive down a country road and wondered if you could do that too if you had enough maples trees at home.
How many maple trees do you need to make syrup? Well it turns out you only need one decent size maple tree to make your own maple syrup at home. One large tree can produce enough sap to boil down into a quart of syrup. If you have several mature maple trees in your backyard like I do, you could make over a gallon of maple syrup every year.
I’ve been making maple syrup at home for years now from just 3 or 4 large maple trees in my yard. They don’t have to be sugar maples either, any type of maple tree will work. In this article I’ll show you step-by-step how to set your taps to collect sap and then boil that sap down into maple syrup.
How Much Sap Can a Maple Tree Produce?
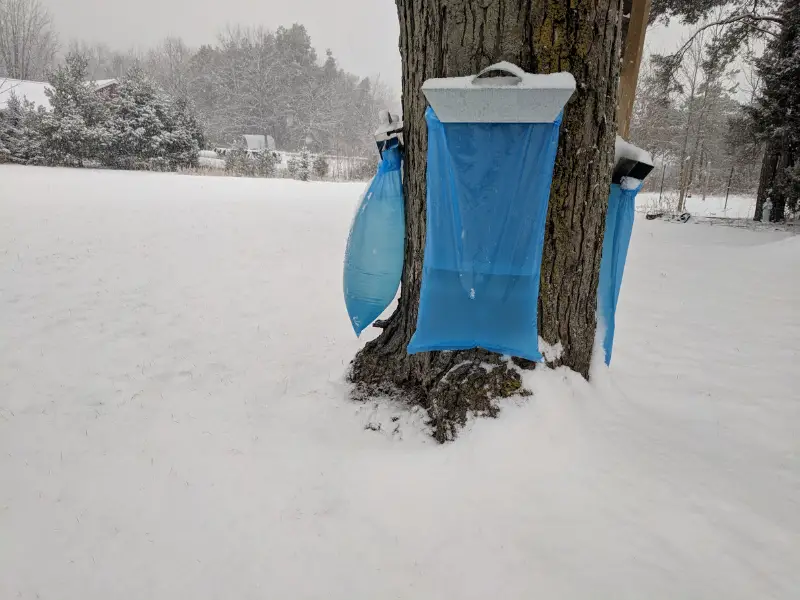
From my experience each tap in a tree will produce at least 10 gallons of sap per season and sometimes much more. I have one tree in particular that will nearly fill a 4-gallon blue sap bag in one day. And that’s from a single tap. If the weather is good for sap flow it doesn’t take many days like that to reach that 10 gallon mark.
In the table below I’ve laid out the number of taps and how much sap and syrup you could expect to get in a season. This should help determine how many taps you need to put in to provide enough syrup based on how much your family consumes in a year. This table gives the minimum you should expect. Being diligent collecting sap and having some trees that are great sap producers could net you close to double these amounts.
| Number of Taps | Amount of Sap | Finished Syrup |
| 1 | 10 Gallons | 1 Quart |
| 2 | 20 Gallons | 2 Quarts |
| 3 | 30 Gallons | 2 Quarts |
| 4 | 40 Gallons | 1 Gallon |
| 5 | 50 Gallons | 1 Gallon & 1 Quart |
| 6 | 60 Gallons | 1 Gallon & 2 Quarts |
| 7 | 70 Gallons | 1 Gallon & 3 Quarts |
| 8 | 80 Gallons | 2 Gallons |
Most beginners have many questions most of which I’ve answered in this article on my website. You can also keep reading for an overview of the easiest and least expensive way to make maple syrup from your backyard maple trees.
What You Need
Pure maple syrup can be expensive, but with a very small investment you can purchase the equipment needed to make your own syrup at home. You can get started for around $15. Of course once you get bit by the maple sugaring bug you’ll want to upgrade some of your equipment. With care and proper cleaning you’ll be able to reuse most items year after year.
Starter Materials to Buy
- Spiles – Taps to most of us. Check the resource page for products I use. It will open in a new tab so you don’t lose your place here.
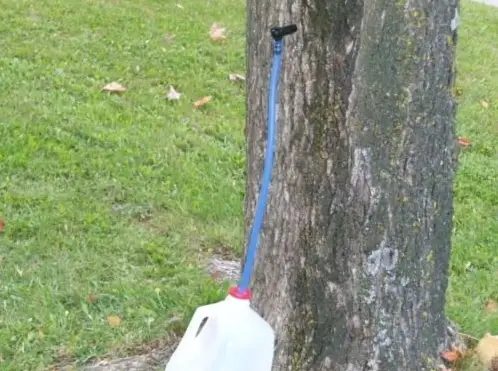
- Clean buckets or jugs – even thoroughly washed out milk jugs will work for this.
- Disposable aluminum roasting pans
Other Equipment and Tools Needed
- Cordless drill with drill bit to match spile (tap)
- Fire pit with grate or propane burner
- Cooking thermometer
- Canning jars
That list is the bare necessities to get started. I use some of those plastic taps listed above with tubing to drain into 5 gallon food grade buckets, but I also use metal taps with galvanized metal hangers that hold sap bags. When I first got started I bought the sap bag hangers from my local Amish hardware store and I like them because with just a quick glance you can see how much sap you’ve collected. Either system works just fine and there are several more types including the old-fashioned galvanized buckets with a lid.
When To Tap
There is not a specific date that you can put on your calendar each spring that reminds you it’s time to tap your trees. I’ve tapped as early as the second half of January and have collected sap right through March. The optimal time to tap maple trees is when the daytime temps are above freezing and dip below freezing at night for at least a period of a few days. Here’s a great short video explaining this more.
This peak period to tap your tree will be different every year and sometimes you can get a nice run of sap early in January or February and then a cold snap settles in which shuts the sap run down. Leave your taps in place and in a few weeks those ideal temps will come back and the sap will start running again.
Once the weather starts warming up into the upper 40s or 50s the bugs start to come out and get into the sap. This is when I pull the taps out and clean up all my collection materials. Don’t worry about the tap hole. The tree will heal itself over the hole left from the spile in several weeks and by the middle of summer you’ll have a hard time even finding where that hole was.
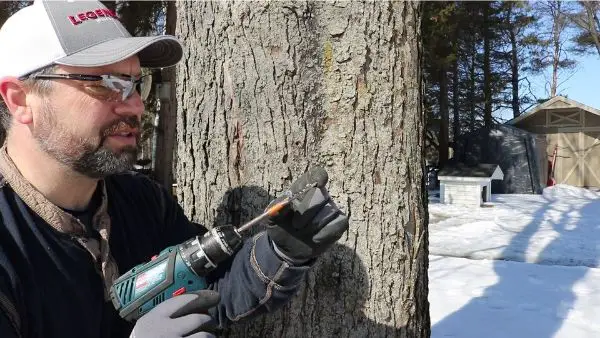
Setting Your Taps
Each tap or spile will have a specific size hole that needs to be drilled. Put a piece of tape around your drill bit about 2 inches from the tip of the bit. This gives you a depth gauge so the hole doesn’t go any deeper than than that. Drill the hole on a very slight upward angle so the sap can easily run out. Tap the spile firmly in place, but you don’t have to drive it in all the way. Just enough so it’s snug in the hole and won’t fall out.
To determine how many taps a healthy tree can handle, use this rule of thumb for tree diameter to tap ratio:
- 12 inch minimum – 1 tap
- 20 – 28 inches – 2 taps
- over 28 inches – 3 taps
Try to locate or remember last year’s tap location and move 6-8″ one way or the other to avoid tapping the same spot on the trees every year. I have a video on YouTube walking you through these steps.
Collecting and Storing Sap
Large scale operations are collecting and boiling sap concurrently so the sap is not stored long at all. For a small backyard operation sap is typically collected all week to be boiled down on the weekend. As long as it’s cold outside the sap will easily store for a week. Keep it covered in a container buried in a snow bank or a shady part of the yard. As it starts to warm up I put the sap in one-gallon jugs and store in my spare refrigerator until ready to boil.
If the sap gets cloudy or smells a little funky than it’s best just to dump it out. A quality finished product requires quality sap. On average the raw sap to finished syrup ration is 40:1. That means if your goal is to make one quart of syrup than you’ll need to collect 40 quarts (10 gallons) of sap.
This amount will vary based on the sugar content of the sap. Generally sugar maples have a larger sugar percentage but almost any maple will make excellent syrup. There are several other trees besides maples that can be tapped for syrup making.
- Sugar maple
- Silver maple
- Black maple
- Red maple
- Norway maple
- Boxelder
- Birch
- Black Walnut
- Butternut
Or check out this article for more information on which maple trees to tap.
Evaporation (Boiling Process)
The evaporation process is nothing more than using heat to evaporate the water in the sap into water vapor (steam) and concentrate the sugar. I have done this a couple of different ways.
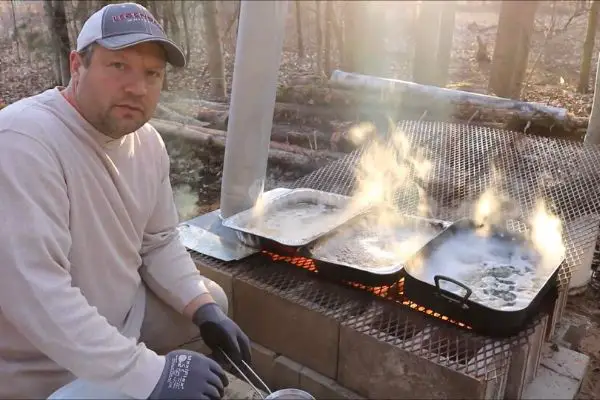
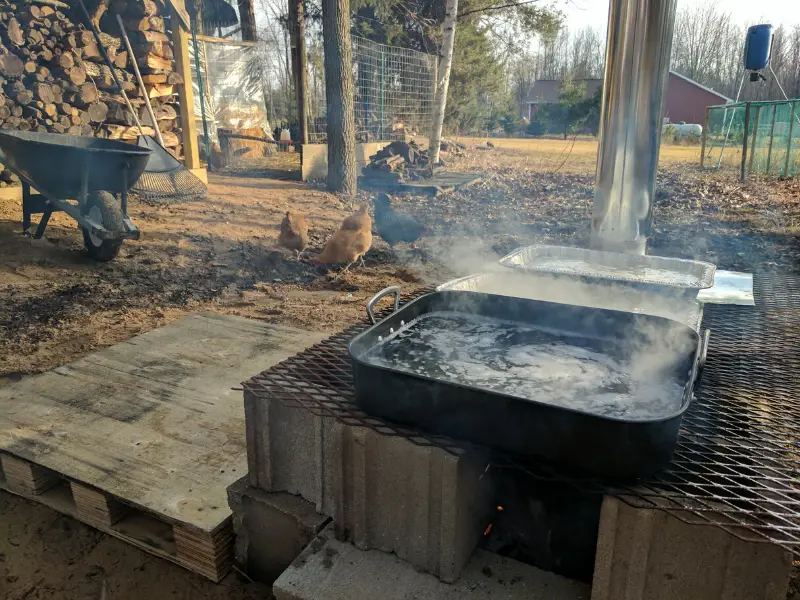
Over a Fire
This is my favorite way for a couple of reasons. It reminds me of the original old-fashioned way of doing it. If you have access to firewood then the fuel cost is zero. If done over an open fire of a nice hardwood like maple, it can give the finished syrup a little bit of a smokey flavor to it. Some folks may like this, but some may not.
I make an evaporator from leftover cement blocks I have lying around and a piece of steel grate. Keep a nice hot fire going with a couple of wide shallow roasting pans on top to give the sap a rolling boil. Continue adding more sap until it’s nearly all boiled down. At this point I take the nearly syrup inside and finish it on the stove top. This makes it easier to control and monitor the temperature. Here’s a video that shows this in detail.
As the syrup starts to thicken, the boiling point will start to rise. Your syrup is finished when the temperature reaches 7.5 degrees above the boiling point of water. I like to check my thermometer first in a small pot of boiling water to make sure it is calibrated correctly. Near sea-level that would mean bringing the temperature up to 219.5 degrees. It’s been my experience to get a nice thick syrup I go to about 220 or 221. If you go any further than this you’ll have crystallized maple sugar. I like my syrup thick, but I’ve noticed when I go to this temperature I do get some crystallization in the bottom of my jars if they sit too long in the fridge after being opened.
Propane Burner
I have also used a propane turkey fryer to turn my sap in to syrup. This is a great way for the first-timer because it is real easy and it works great for small batches. I still bring it in to finish on the stove as it close to being done. The only downside to this is the cost of the propane can outweigh the value of the finished syrup. For a fun family weekend project though it can still be worth the expense just to say you made-it-yourself. I’ve made a video showing how easy this exact process is.
Bottling
Bottling can be a simple as pouring hot syrup in to sterilized canning jars and sealing with a screw cap and lid. As the jars cool the lid seals just like when you can salsa. You can also buy a case of nice looking maple syrup jars like these ones on on Amazon.com if you want a nicer presentation for your syrup. I even went so far as to order stickers for my jars from Sticker Mule.
I hope this gives you the confidence to go ahead and make some homemade maple syrup from your own backyard. Check the resource page for all the equipment you might need.